Stealth Sustainability: Remodeling our 1960s Mid-Century Modern Ranch house for comfort, style and efficiency
Part I - Fixing the urgent stuff

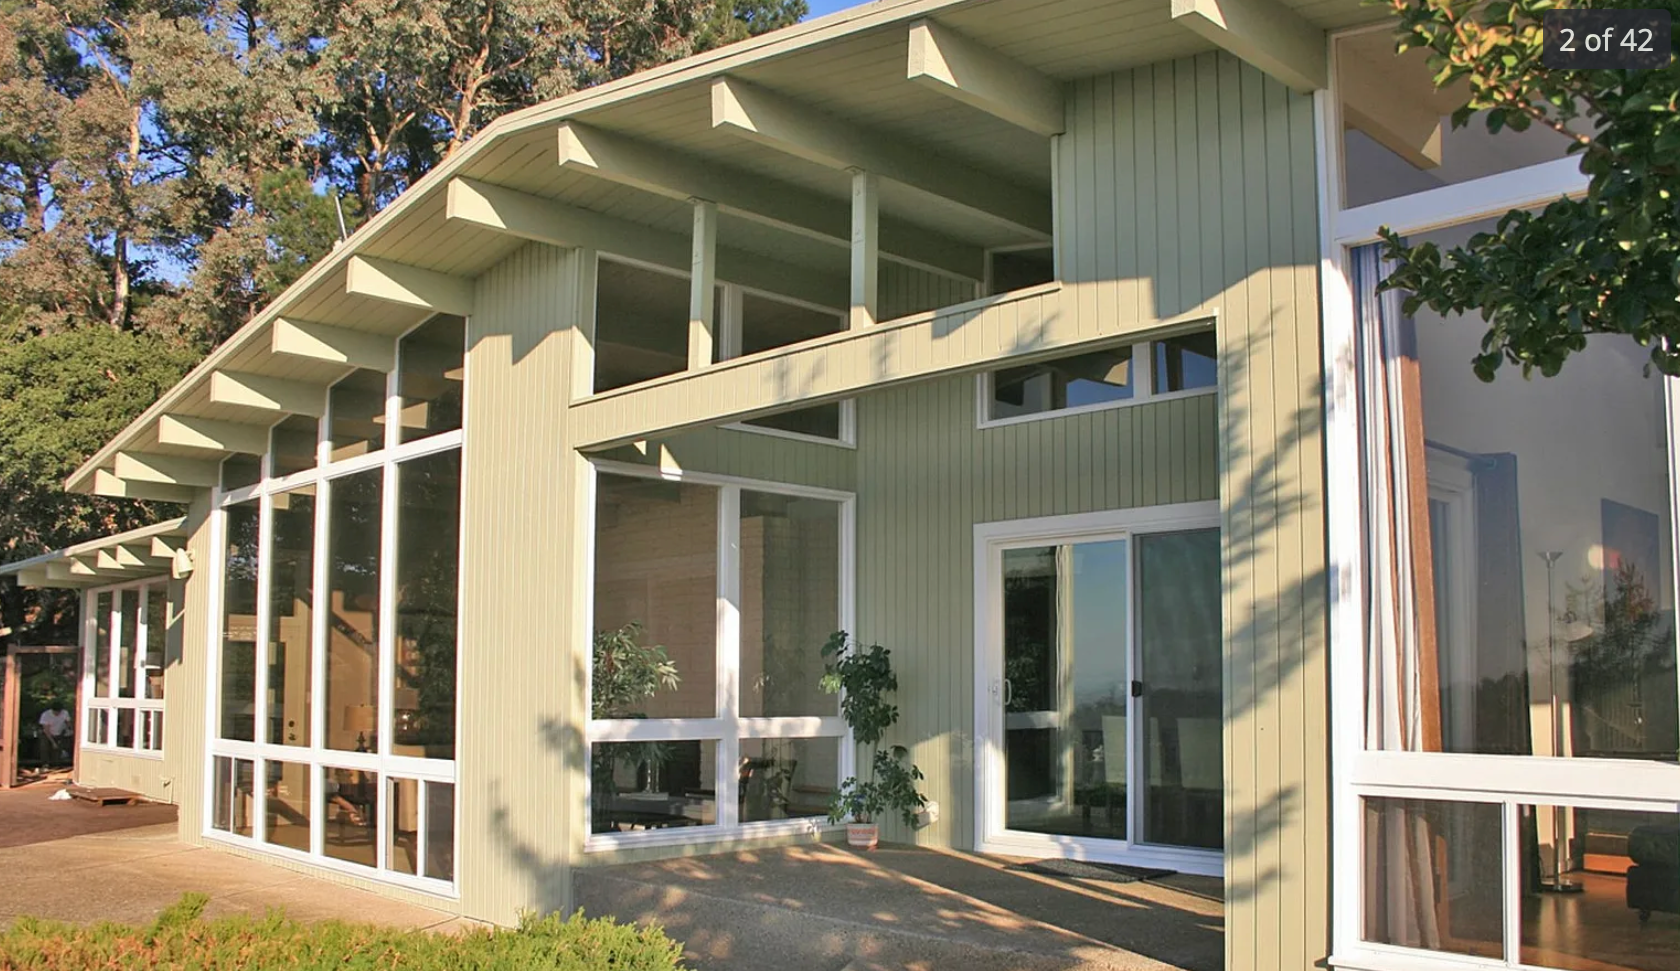
In 2012 we bought a mostly original 1960 mid-century modern house from the original owner. (The image on the homepage is the original blueprint!) We loved the open-plan, post-and-beam construction with massive glass windows opening out to the yard. But if you’ve ever looked into original Eichler houses, you know there are a lot of upgrades needed! Here’s the story.
Project Snapshot
- Year Built: 1960 mid-century modern ranch house
- Size/Layout: 2,300 sf; 3 bedrooms; 2.5 baths; single story, open plan, big windows.
- Structure: Post-and-beam; low-slope and flat roof; vented crawlspace (not slab)
- Original Systems: 100-amp electrical service with knob-and-tube wiring, gas furnace with floor ducts; gas water heater; ~1,000 square feet of single-pane windows, 2 cement block/brick fireplaces.
- Primary Goals: Preserve mid-century lines & indoor-outdoor flow; fix short-term problems; cut noise and bills; improve comfort and efficiency; open up cramped kitchen area; replace antiquated electric/plumbing systems; add earthquake resistance.
Before & Goals (what worked / what didn’t)
- Loved: exposed beams, high tongue-and-groove wood ceilings, massive windows with yard connection, light, views, mid-century style.
- Pain points: cramped kitchen isolated from other rooms, old original systems and finishes, summer heat from west-facing big glass, super-noisy inefficient heat, lack of storage/cabinet space, leaky roof, almost no insulation.
- Electrification targets: Add solar and shift as much energy use as feasible to self-generated over the long run.
Phase 1: Fix the urgent stuff
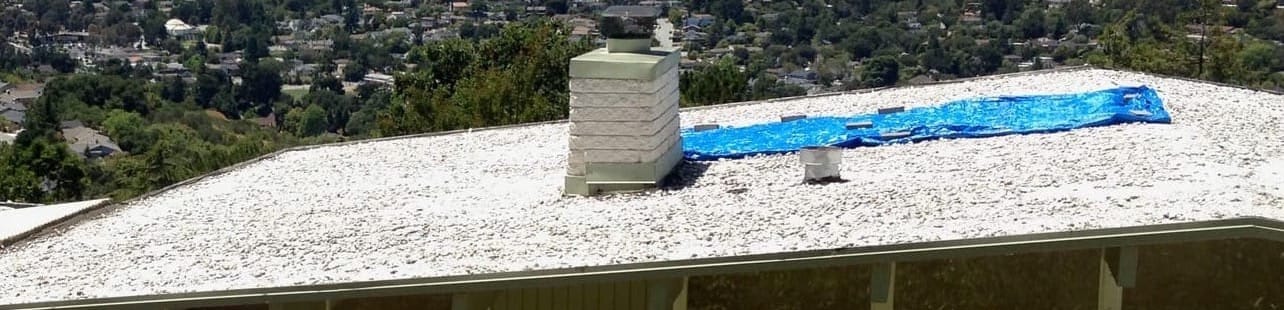
Leaky Roof:
As we discovered with the first rain, the roof leaked! It turned out the previous owners had replaced the flat sections of roof, but not the low-slope sections. So we needed to replace that portion.
In order to match the style with the existing section, it needed to be tar-and-gravel, which is the old original roofing of the era. We found a local contractor that did this kind of roof (A&B Roofing), and also added another layer of foam insulation (for 4 inches total, about R-25) between the top of the roof and the tar-and-gravel waterproof layer.
Awful HVAC:
The heating system was a contractor-grade 100,000 BTU gas furnace installed in a closet in the hall that was so loud we couldn’t run it at night at all. And on winter mornings, it would take 4 hours to get the house up to 68 degrees.
In addition to a sub-par furnace, there were old leaky ducts. A blower-test of the ducts revealed 32% leakage (529 cfm) to the outdoor-vented crawlspace... meaning 1/3 of the heat from the furnace was escaping before it even reached the house!
After talking with a few HVAC professionals (even ones with high consumer reviews) and receiving sketchy recommendations, I found Sandium out of San Jose, who understood the concept of leaky ducts, replaced the whole system, ducts and all, for high-efficiency multi-staged, 97% efficiency furnace relocated to the crawlspace, freeing up a closet storage space in the hallway as a bonus. I had found Sandium from a recommendation from another HVAC company in the east bay who had created some incredibly detailed videos and descriptions of how they approach installing an HVAC system to maximize efficiency and minimize air leaks, but who didn’t service my area.
The improvements in livability with these 2 upgrades (roof insulation and HVAC) was amazing. Dropped gas consumption (and winter bills) by 30%, eliminated all HVAC noise, and we could adjust the temperature as we needed without huge lags.
Added A/C:
A few years later, after some incredibly hot heatwaves (this particular day we were hotter than Phoenix, AZ) we realized we needed to get air conditioning.

This was a fairly simple add-on to the new furnace, but at the time it required us to switch from an old electric cooktop to a gas one, in order to avoid a major electrical upgrade - there was no space nor capacity in our electric panel. In doing the gas line to the cooktop, we discovered some major issues with the gas system - there was a leak in the line outside, and splicing into the gas line under the house introduced additional leaks in the fittings, requiring replacement of a portion of that line as well. (This is the challenge with doing partial upgrades to an old house... everything leads to something else needing to be fixed!)
We realized a few years later how important adding A/C had been, when the whole bay area was shrouded in smoke for days on end and we could keep our house closed with MERV 13 filtered air inside.
Phase 2: The Bigger Remodel
By 2020 we were ready for the bigger project. But of course Covid delayed everything so the whole process took quite a bit longer than expected.
Stay tuned for Part II!